Our mission Future of compute - green, open, efficient
Blog.
Step-by-Step Guide to Setting Up a Proxmox Test Cluster with High Availability via the WebGUI
Geschrieben von Marek Weber
In an increasingly digitalized world, many companies rely on running their services and applications in virtual machines (VMs) that are scalable and highly available — and for good reason: cost-efficiency and energy efficiency are more in focus than ever. Especially for smaller on-premises environments, Proxmox VE is emerging as an attractive alternative alongside Yaook OpenStack . The highly integrated open-source virtualization platform offers a cost-effective way to consolidate the management of VMs and LXC containers, software-defined storage (SDS), and high-availability clustering into a single, well-coordinated solution. This makes Proxmox VE go far beyond mere workload virtualization.
With a Proxmox VE test cluster, you can not only set up a portable development environment, but also gain initial experience with cluster configuration and the high availability concept using Corosync and Ceph
In this blog post, we’ll walk you through, step by step, how to quickly and easily set up a Proxmox test cluster with three nodes. We created this guide directly on a laptop that serves as our compact, travel-friendly development environment. You can find a detailed guide to installing Proxmox here.
The aim of this article is to show you that Proxmox can do much more than just virtualize resources. One of its most compelling features is the straightforward setup of high availability – a key advantage for companies looking to effectively minimize downtime.
Was dich im Blogpost erwartet:
1. Das Setup
To create a Proxmox cluster, we use three virtual Proxmox VE machines in this example. They are configured as a minimal Proxmox high-availability cluster with an integrated Ceph cluster. The cluster consists of the machines px1, px2, and px3, each equipped with three network interfaces (net0, net1, and net2) assigned to the following functions:
Uplink [10.10.10.10x/24] → general network traffic, including management
Corosync [10.10.11.1x/24] → high availability via replicated cluster volume
Ceph [10.10.12.1x/24] → storage replication
To illustrate this, an image has already been created in the blog post comparing Proxmox and OpenStack, showing the 3-node HA cluster with broadcast bonds and direct cabling.
The guide covers clustering in two phases. First, the virtualized Proxmox nodes are connected to each other by linking them via shared virtual bridges on the hypervisor. The Corosync Cluster Engine, an open-source group communication system, enables communication between the nodes and ensures a consistent configuration. In addition, Corosync allows the nodes to detect errors and failures.
In the second step, the Ceph cluster is set up to provide highly available storage for the machines. High availability is achieved through the combination of Ceph and Corosync, as virtual machines (VMs) in the cluster can be quickly restarted on other nodes in the event of a node failure, or redistributed according to resource requirements.
The networks for Corosync and Ceph are characterized by a ring topology. Communication takes place directly via ring-separated virtual bridges on the hypervisor, resembling a flat physical Layer 2 communication according to the ISO/OSI model. Each node (px1, px2, px3) also has three virtual disks (scsi1–3), each equipped with a preconfigured WWN (World Wide Name) for storage identification. In this context, a special form of UUID is used to uniquely distinguish the different storage devices. This identification is crucial for the efficient management and operation of the storage system. The virtualized environment of the individual machines is illustrated in Figure 1.
Figure 1: Virtualized environment of the individual machines
2. Step-by-Step Guide to Setting Up a Proxmox Test Cluster with High Availability via the WebGUI
In the first step, it is explained how the virtualized Proxmox nodes are connected to form a cluster using the Corosync Cluster Engine. As shown in Figure 2, the process begins with a freshly installed Proxmox environment, in which the virtual machines (VMs) still operate independently of one another.
Figure 2: Initial state of a Proxmox environment
During the preparation, attention should be paid to a consistent and correct NTP configuration. This can be done either in /etc/chrony/chrony.conf or, as in this example, in /etc/systemd/timesyncd.conf
It is important that all nodes can reach each other via their hostnames within the correct HA network ring. Therefore, the entries in the file /etc/hosts should be configured accordingly on all nodes, as shown in the following code example.
127.0.0.1 localhost
10.10.11.11 px1
10.10.11.12 px2
10.10.11.13 px3
[…]
3. Creating High Availability in Proxmox via the Web GUI
3.1. Creation of the Corosync Cluster
To create High Availability in Proxmox, navigate to the Cluster options in the datacenter–overview of the cluster–options. .
Figure 3: Overview of Cluster Options
In the next step, click on the button Create Cluster.
Figure 4: Creation of the Cluster
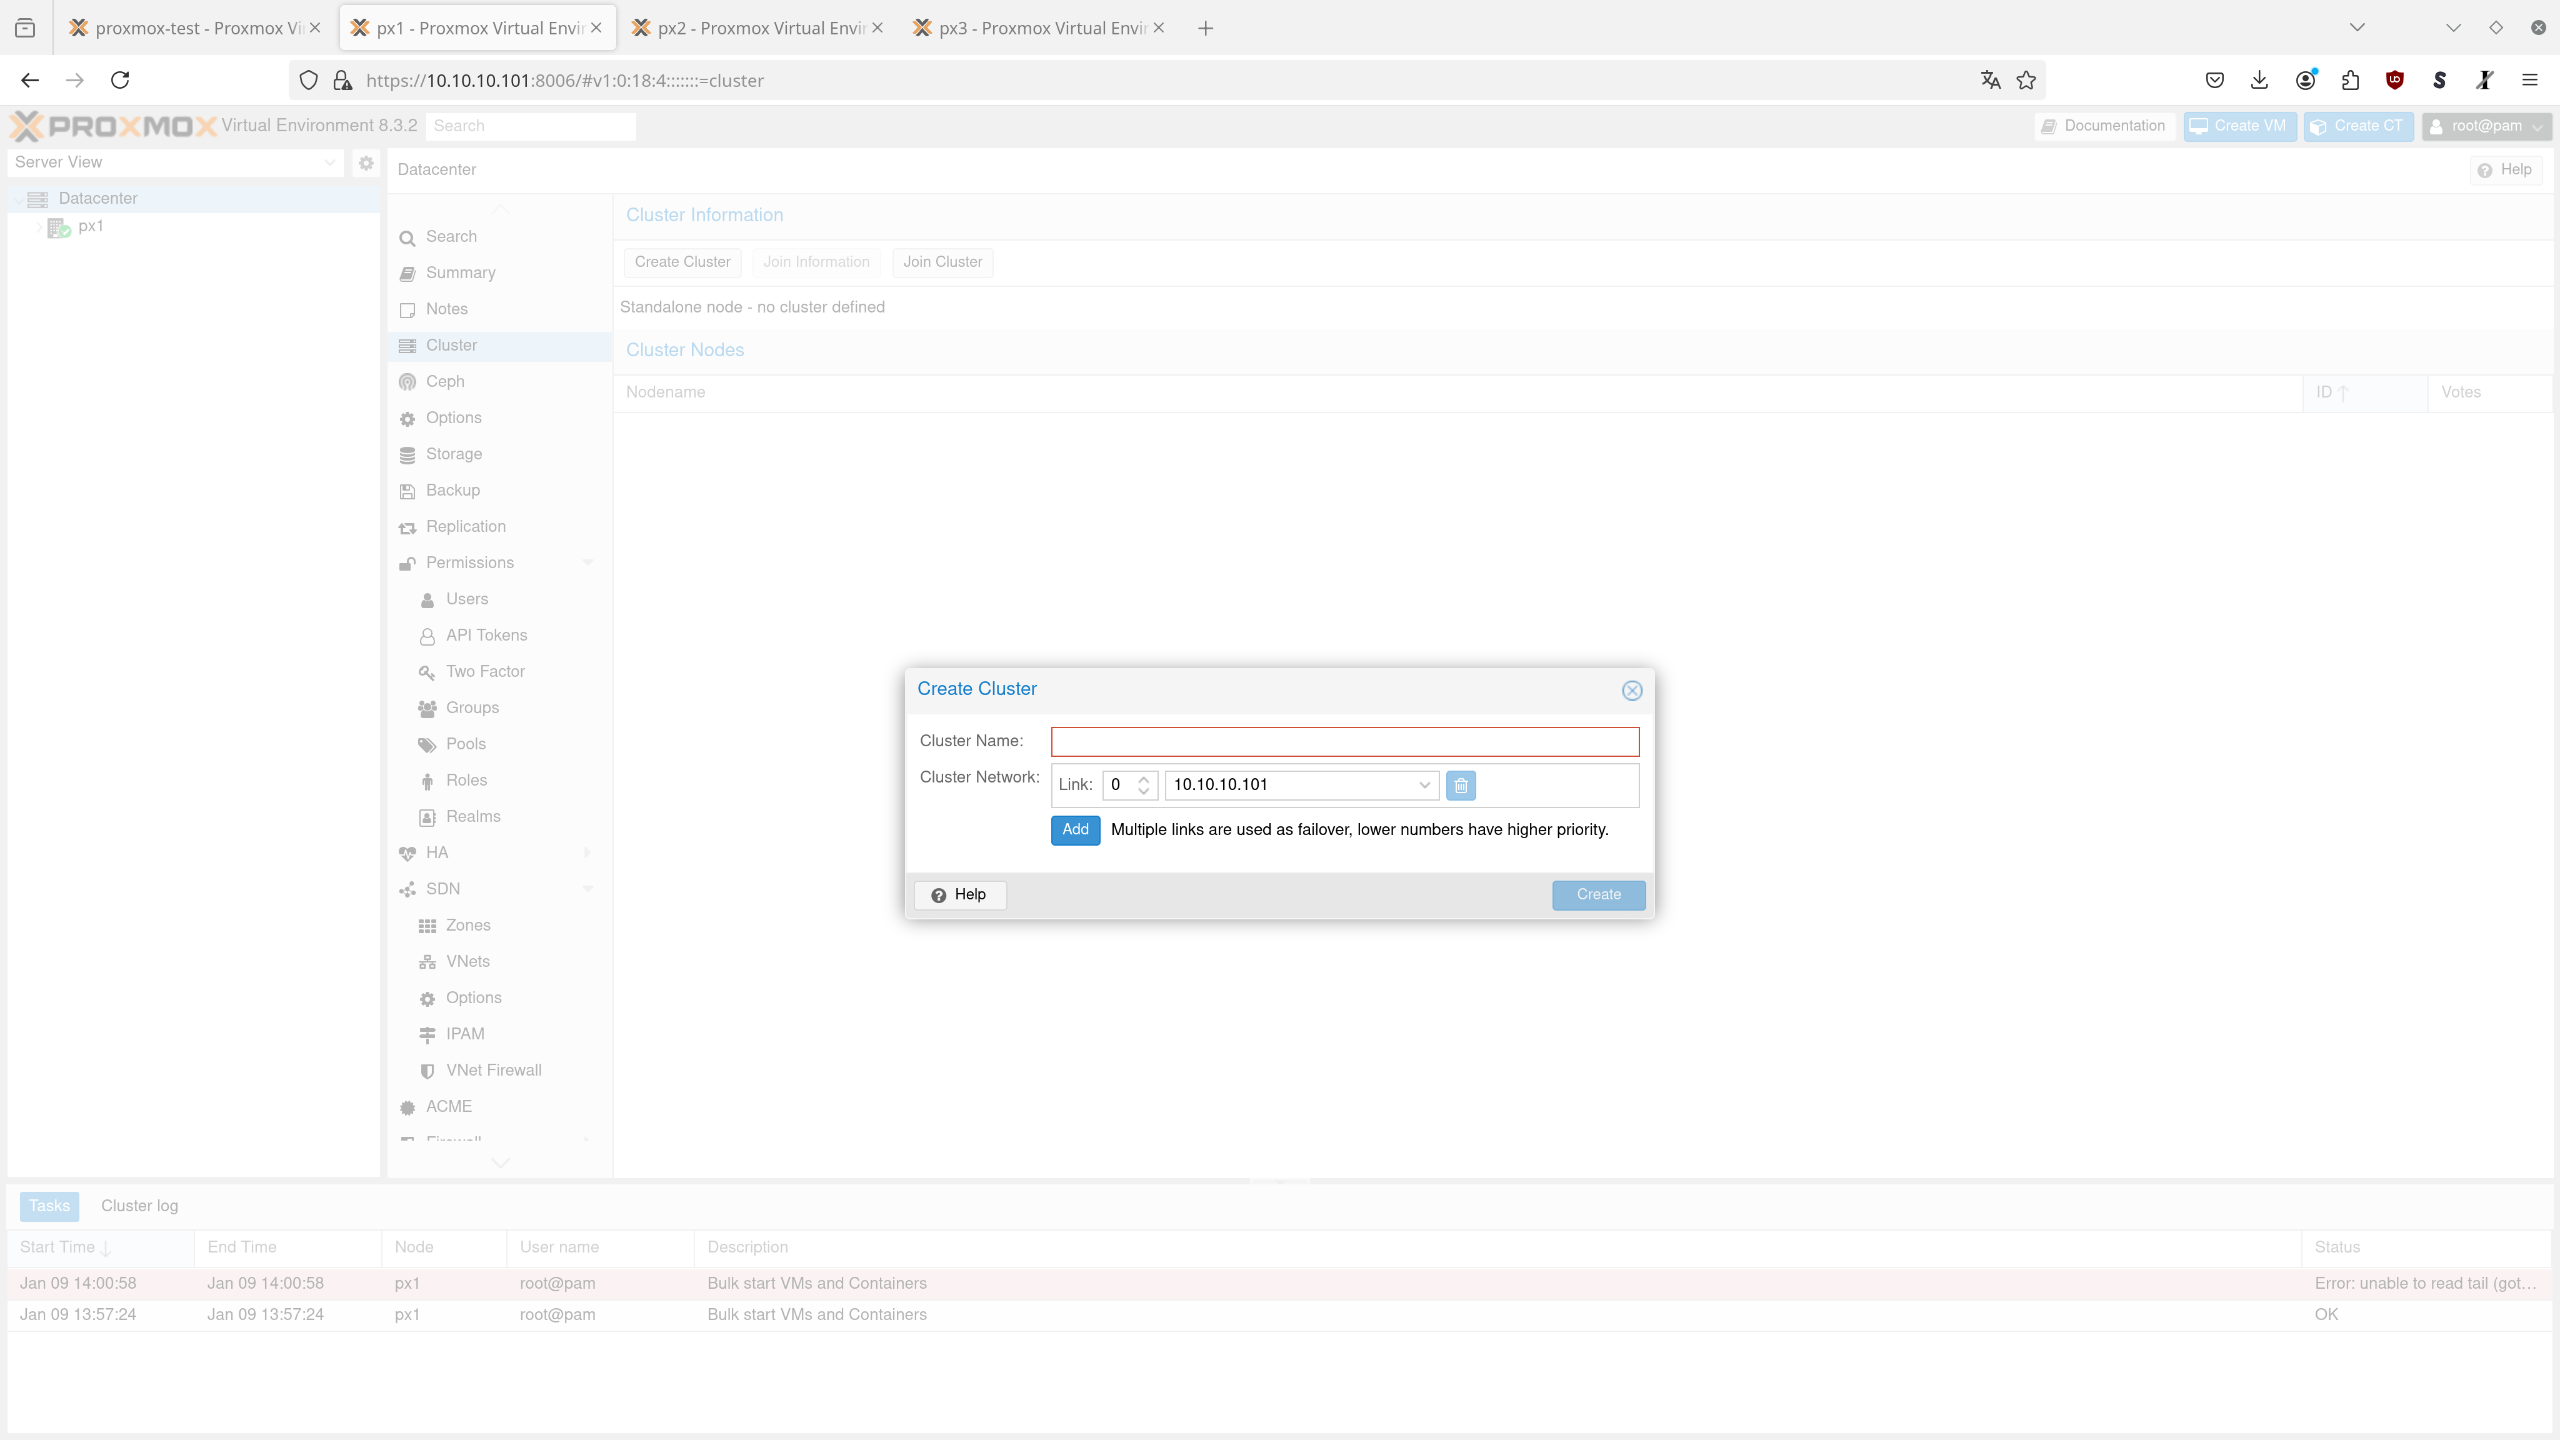
Now, assign a name to the cluster and select a network interface for high availability on px1.
Figure 5: Assigning the Cluster Name
Upon successful creation, the window shown in Figure 6 will open.
Figure 6: Cluster Creation
In the next step, the join information is required to add the other nodes. This can be retrieved and copied by clicking on the "Join Information" button.
Figure 7: Adding Nodes to the Cluster
To add all three nodes to the cluster, switch to the second node (px2) and click on the Cluster option in the Datacenter view. Then, select "Join Cluster" and paste the previously copied join information. Enter the password of the peer node and verify that it is detected in the network. If everything is correct, confirm by clicking "Join".
Figure 8: Adding Nodes to the Cluster
Repeat this step now with the third node (px3). Afterward, as shown in Figure 9, all three nodes should be connected in the cluster. They can now communicate with each other and be configured uniformly.
Figure 9: Connected Nodes in the Cluster
3.2. Erstellung des Ceph-Clusters per WebGUI
The following steps outline the creation of a Ceph cluster. First, the three nodes in the Proxmox cluster are signaled to create an empty Ceph cluster. This process must be carried out individually for each node. Then, select the first node and open the Ceph options.Now, click on Install Ceph.
Abbildung 10: Ceph-Installation
Select the current Ceph version(squid 19.2)and the "No-Subscription" repository.
Figure 11: Selecting the Ceph Version and Repository
Note: The installation may need to be confirmed in the console output, as shown in Figure 12.
Figure 12: Confirming the Ceph Installation
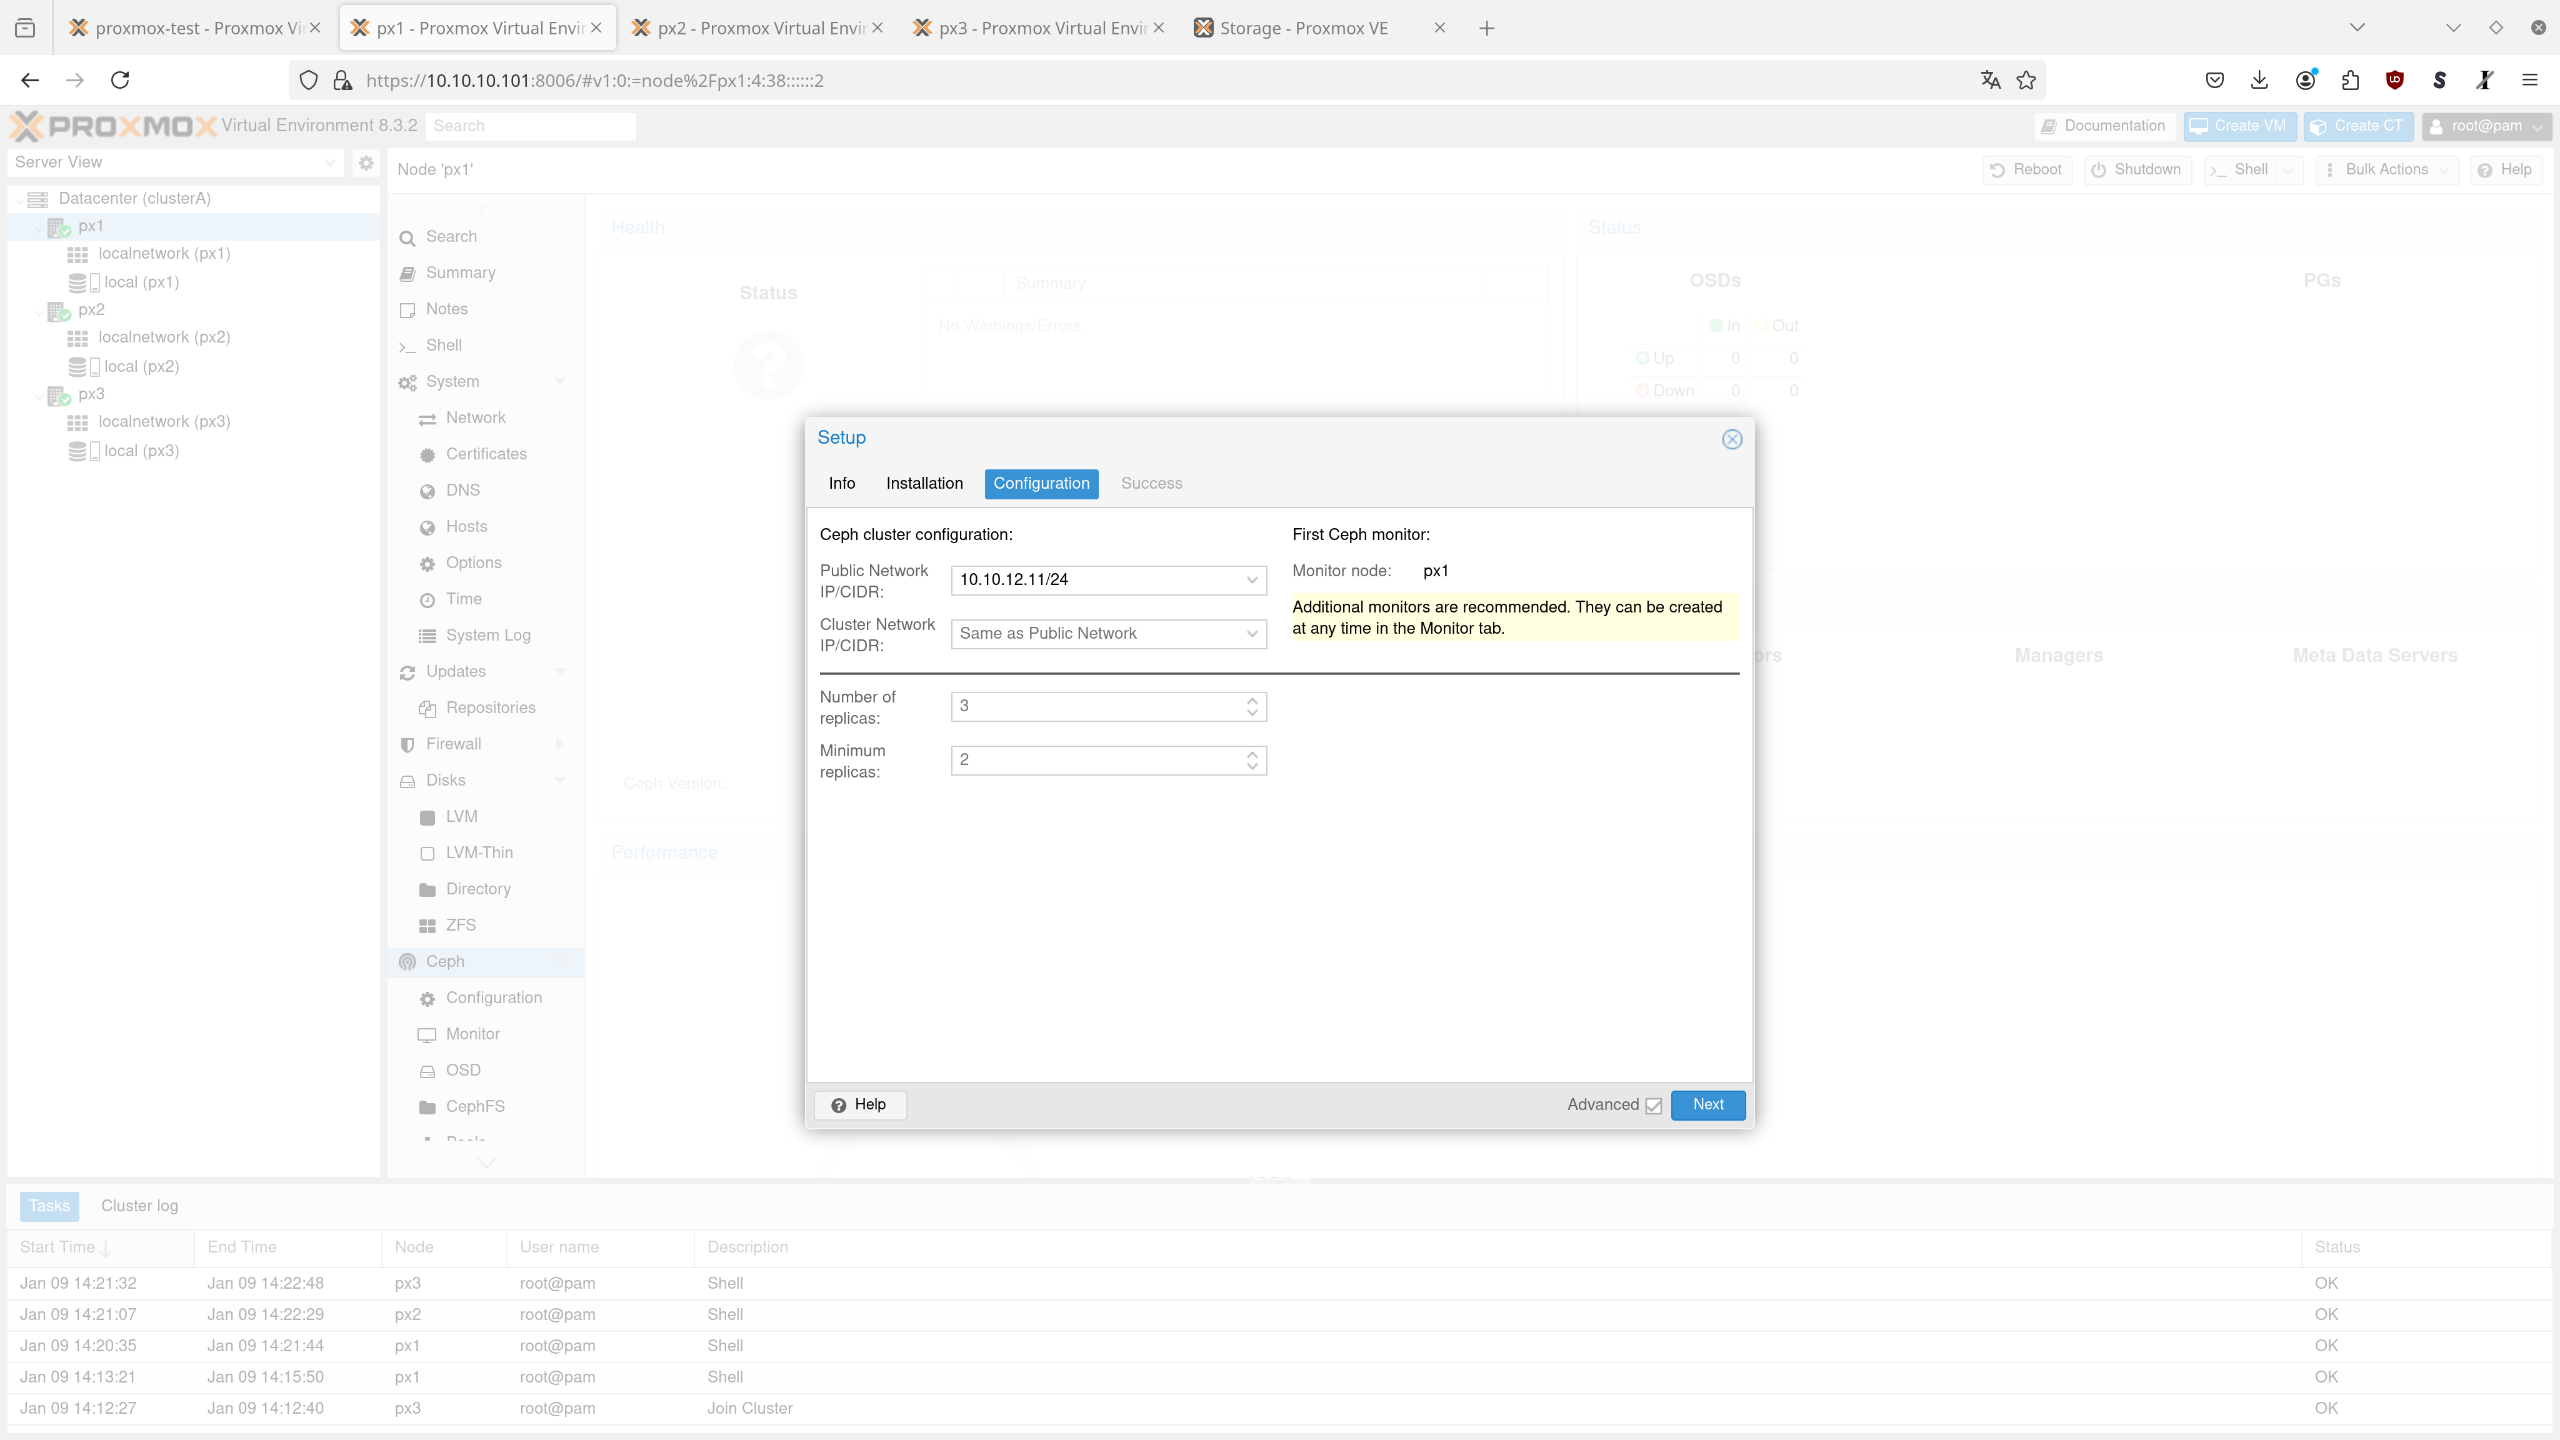
The following step configures the Ceph node. As shown in Figure 13, the Public Network and the Cluster Network in the example are identical and have been set to the node's IP in the Ceph ring. Both the number of replicas (3) and the minimum replicas (2) remain at their default values, and the configuration is confirmed by clicking "Next. "
Figure 13: Ceph Cluster Configuration
By clicking the "Finish" button, you can now complete the Ceph configuration.
Figure 14: Completing the Ceph Configuration
3.3. Adding Storage Devices (OSDs) to Ceph
For a successful setup, it is necessary to make the additional disks available to the Ceph cluster via Object Storage Daemons (OSDs). To do this, go to the Ceph OSD suboption in the node overview, as shown in Figure 15.
Abbildung 15: Ceph-OSD-Unteroption
Click "Create: OSD" and select the disk as the storage device. All other options can be left at their default settings.
Figure 16: Create: Ceph OSD
In der Übersicht erscheint nun ein neuer OSD.
Figure 17: Overview of the New OSD
In this overview, the other OSDs from the other nodes will appear after they have been provisioned.
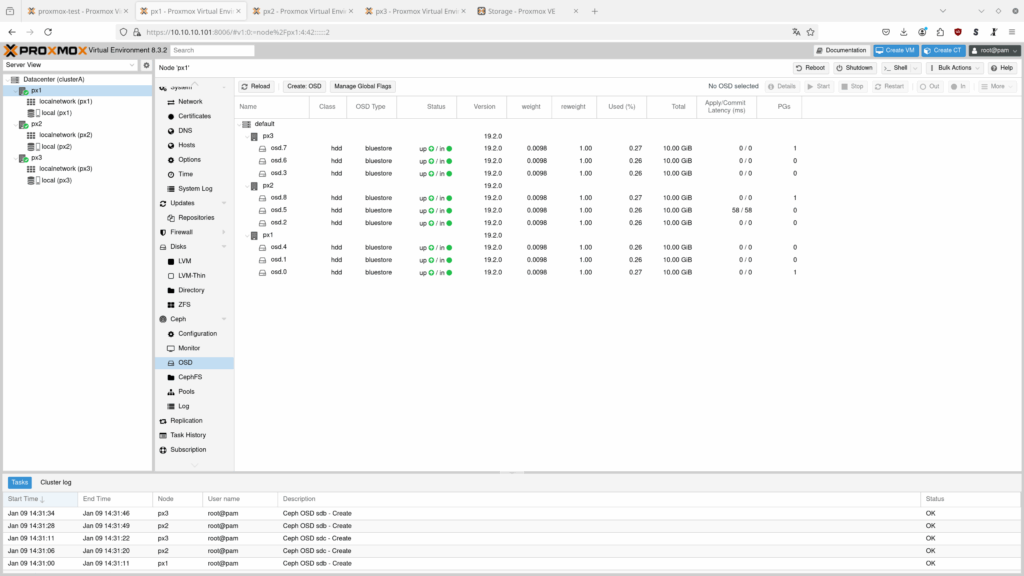
Figure 18: Overview of All OSDs from the Other Nodes
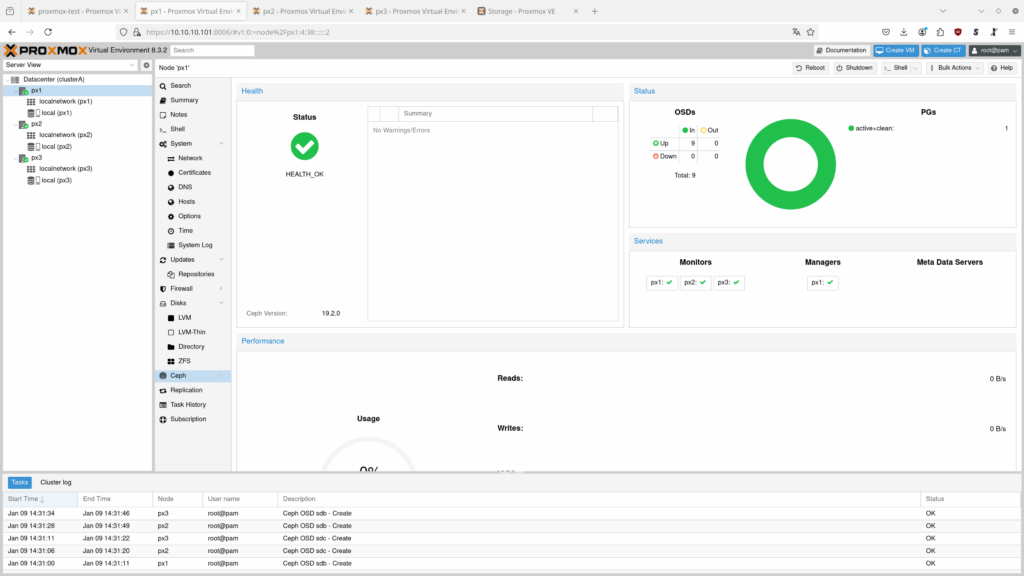
Once the overview of the Ceph cluster is fully set up, all nodes should display the status "up" (Figure 19), and the overview should show the status "HEALTH_OK" (Figure 20).
Figure 19: Ceph Cluster After Full Setup
Figure 20: Ceph Cluster After Full Setup
3.4. Creating the Ceph Pools
Finally, the available storage in the Ceph cluster is provisioned as pools, so it can be efficiently used by Proxmox VE to store VM disks, snippets, and other data. The following steps to create the Ceph pools only need to be done once and will configure the pool for the entire Proxmox cluster. In the first step, go to the Ceph pool options on the Proxmox node and click "Create."
Figure 21: Overview of Ceph Pool Options
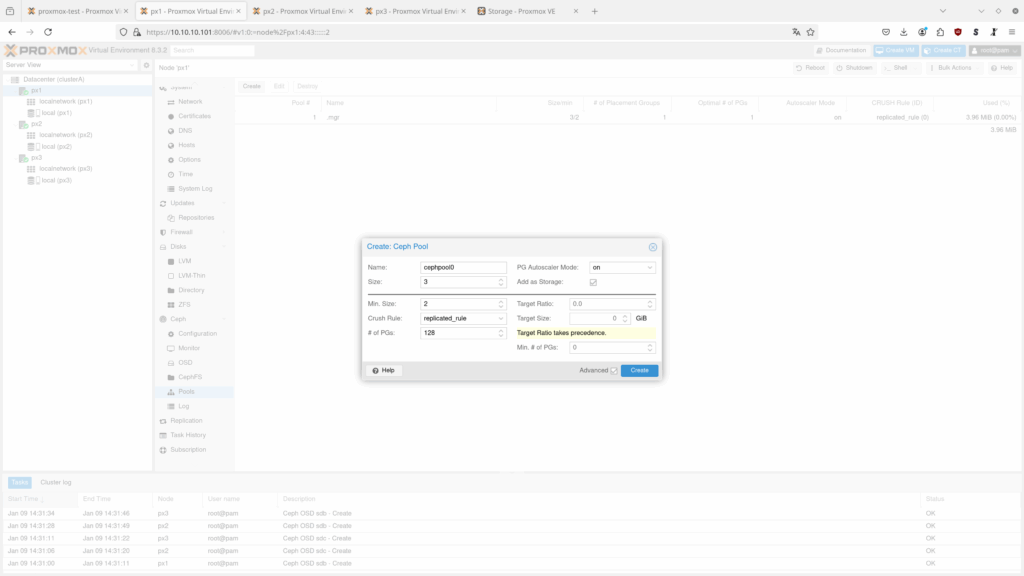
Assign a name to the pool. The Ceph pool should now be available to the entire Proxmox cluster.
Figure 22: Create Ceph Pool
Figure 23: Ceph Pool
Figure 24: Ceph Pool in the Storage Overview
4. Summary
In summary, this step-by-step guide provides a practical introduction to setting up a Proxmox test environment. This allows you to get to know the tool better and become familiar with its functionality.
Please note that this is a purely test environment based on virtualized nodes within a nested virtualization setup. This configuration is not fault-tolerant and is therefore not suitable for production use. For actual business operations, we recommend a stable, physical infrastructure in a high-performance data center to ensure an uninterrupted and reliable solution.
Are you interested in a Proxmox environment for your company? Feel free to contact us! We would be happy to set it up for you and take care of the lifecycle management of your infrastructure.
Cloud-Lösungen sind nicht immer die günstige Wahl! Steigende Kosten und der Wunsch nach mehr Kontrolle führen Unternehmen zurück zu On-Premise. Entdecke, warum der hybride Ansatz und Open-Source-Tools die Zukunft der digitalen Infrastruktur sind.
This article compares the open source virtualization solutions Proxmox VE and OpenStack. It examines their functions and possible applications in different scenarios.
You are currently viewing a placeholder content from Google Maps. To access the actual content, click the button below. Please note that doing so will share data with third-party providers.